Monday 31 March 2014

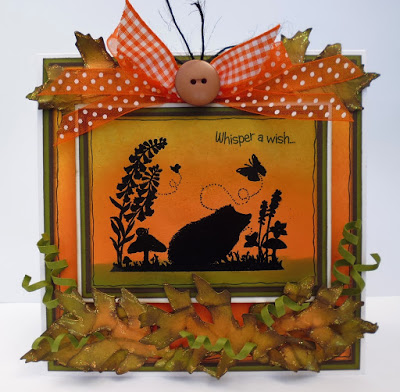
Little Claire Likes - 'Silhouette Owl Tree'


Good morning, thanks for stopping by our blog today.  We are sharing another 'Little Claire Likes'.  Our featured stamp set today is 'Silhouette Owl Tree'. A really cute little stamp that can be purchased at the special price of £3.99 (normally £6.50), until Thursday, 3rd April 2014 or whilst stocks last.

Heidi has made a quick little card using the stamp, a Versafine inkpad and a Memory Box stencil that can also be purchased from our website HERE.

Here is Heidi's card


Heidi has listed the products used below and also given a small tutorial on how the card was made.

Products Used :

Little Claire 'Silhouette Owl Tree' stamp set - £3.99
Memory Box Stencil 'Garden Flora' - £4.50
Versafine 'Onyx Black' Ink Pad - £5.50
Stampendous Detail 'Clear' Embossing Powder - £3.50
Kraft card pack (x10) - £1.99
White A4 Stamping Cardstock - £3.50
Memento 'Rich Cocoa' Inkpad - £3.90
Tim Holtz 'Vintage Photo' inkpad - £4.50

Black card, pearls and owl charm from stash.

Card Instructions :

(1) Stamp up 'Owl Tree' image using 'Versafine' inkpad, cover with embossing powder and heat with heat gun.
(2) Cut out a large circle, cover tree image and hold with masking tape.
(3) Cover image with 'Garden Flora' stencil and ink using 'Vintage Photo' inkpad, ink all over.
(4) Mount image onto black card.
(5) Cut a strip of black card, cut into each end as shown, stick down.
(6) Stamp up sentiment onto white card, stick to centre of black strip.
(7) Add two black pearls.

We do hope you have enjoyed our tutorial today and don't forget to snap up your 'Owl Tree' stamps before Thursday.

The Little Claire Design Team

xxx


Friday 28 March 2014

Easter Changing Tree Project :) x

Hi there! It is my turn (Helen R) to share a project with you today. I have chosen to make an Easter card with the gorgeous ‘Changing Tree’ stamp set. I love how versatile this stamp set is, with all the additional embellishments available! J


You will need
Changing Tree’ stamp set (Little Claire)
Changing Tree Easter’ stamps set (Litle Claire)
‘Happy Easter’ sentiment stamp
White stamping card
ProMarkers
Dark brown cardstock
Green and yellow patterned papers
Card Candi
Ribbon
Small yellow gems
Adhesives: 3D foam pads and glue

1.  Stamp out your Easter changing tree, arranging the elements to suit your card. Colour with ProMarkers, trim and mount onto dark brown card stock.
2. Cut different patterned papers to the following sizes, mounting each piece onto brown cardstock: 13.5cm x 12cm, 13cm x 6.5cm & 10cm x 10cm.
3. Arrange these pieces as shown below, lining them up so that they will fit onto the card blank then stick together. Stamp out sentiment as shown. 


    4. Attach a piece of ribbon and tie in a bow before attaching the panel to the card blank. 
    5. Use 3D foam pads to attach the main image.
    6. Finally, add Card Candi to the top right hand side and three small gems underneath the sentiment to finish off your card. 

Thanks for taking the time to look at my project, I hope you find it useful for those Easter cards you are yet to make! J Helen R x

Thursday 27 March 2014

Hello everyone...

...today we have a GIVEAWAY!

We have 10 FREE TICKETS for a new craft show at WREXHAM N. WALES.

Papercrafts @ Wrexham is a new show run by the Sincerely Yours team on Saturday 07 June 2014
10am - 3.30pm and every ticket holder will receive free tea and coffee.

To claim your ticket please contact carol (first come first served)

Little Claire x

Wednesday 26 March 2014

It's one of our teamies birthday today...

Happy Birthday Doreen!

Doreen is one of our new teamies and her birthday has given us the idea to feature the work of our teamies from the past year when it is their birthday - so without further ado here are a selection of Doreen's lovely cards, Hot Air Balloons is one of our new stamp set this year, we love it that the balloons are seperate stamps and the ground is too (and lovely and swirly!)

Hot Air Balloons
Good Times is our current club stamp set containing the owl, wine bottles and stopwatch, here is the owl:


here are the wine bottles:

and here is the Stopwatch:

Here is Book Owl stamp in gorgeous shades of blues:


and here are our lovely Silhouette Elephants:

and finally, Meadow Girl silhouette stamp:


 A great assortment of card ideas and Doreen runs classes for us too here on the Wirral, it would be great to see you, make a day of it with Doreen and Helen - click here for more info.

Little Claire xxx

Our next craft show: Papercrafts, Thetford - Brecklands Leisure Centre Sunday 30 March 10am-4pm


Tuesday 25 March 2014

Tuesday morning...

..finds us busy processing our club packs for April, Carol is currently doing this and I keep distracting her, we are currently fantasizing about eating scones (the whole works with cream and jam) sitting in a courtyard in the sun, with flowers in pots, listening to the birds, a cat nearby and bees buzzing, with the sun not too hot but warm enough to warm the bones!

Anyway, back to reality!  Yes we have started to process our club packs so all our lovely club members will be receiving a nice package in the post this week, and here's a special message to all our members: make sure you read the newsletter in your pack this month because it contains details of a very special club member offer - not to be missed!

We asked last week whether or not you would like a bit of a sneak peek of April's club stamps, the answer was 'yes' so here we are:

Look away now if you don't want to see:

ooooooh....


 ??????????


OK, that's it, the packs are being processed and will be on their way to club members this week, and please check your newsletter!

If you would like to join our club or find out more info click here or give us a call: 0844 800 4376

Have a good day, Little Claire x


Monday 24 March 2014

Little Claire Likes - 'Sweetest Wishes' Pop-Up card

Welcome to another Little Claire Likes. Where we share a new project each Monday, using a new or much loved stamp from our extensive range.
 
Today, we are showcasing 'Sweetest Wishes', a stamp set that comes with three useful sentiments.  It is a beautiful image, which would be perfect for Mother's Day, coming this Sunday.

 
You can purchase this lovely set from the website HERE for the special price of £3.99 (normally £5.50). Only until Thursday, 27th March, when it returns to full price.


 Heidi's card today is a 'Free Standing Pop-Up Card', which are perfect for 'special' cards. It folds flat for posting (shown below).

 
Here is a list of the products, she has used :
 
Promarkers Used : Khaki, Pastel Beige, Blossom, Rose Pink, Putty, Caramel and Ice Grey 1 - £1.70 per pen
Pink card and MB Isabella Butterfly die from stash, flowers from Hobbycraft.
 
How the card was made :
 
(1) Cut a piece of 'Aloe Vera' cardstock to measure : 11" x 4 1/4". Score well at : 1", 2 3/4", 3 3/4", 5 1/2", 7 1/4", 8 1/4" and finally 10".
(2) On 5 1/2" score line, cut a hole from 3/4" point down to 3 1/2" only.
(3) Cut a piece of 'Aloe Vera' card to measure : 2 3/4" x 5 1/2".
(4) Cut a piece of white card : 2 1/2" x 5 1/4", stamp 'Sweetest Wishes' image onto it, colour in.
(5) Stick image onto green back, put to one side.
(6) Stick strong double-sided tape to bottom two ends.
(7) Pop image through hole in score-line and stick inside two bottom ends.
(8) Stamp up 'Sweetest Wishes' sentiment, matt onto green card.
(9) Cut two pieces of green dotty paper to fit top two pieces of card and a smaller piece to fit front panel.
(10) Die-Cut 'Sprig Border' from green card and 'butterfly' from pink, add to card.
(11) Stick sentiment to front of card, add flower and pearls.
(12) Add 'Wink of Stella' glitter to flowers and butterfly.
 
We do hope you have enjoyed our project today. Please do join us next week for another.
 
The Little Claire Team
 
xxxx


Friday 21 March 2014

Little Claire Friday Project - Swirly Birds Mini-Album

Hello, Heidi here to share this week's blog project.
 
I have made a little wedding mini-album, using the gorgeous 'Swirly Bird's' stamp set.  It is a great little set with three larger images and lots of little sentiments.
 
I have coloured the images in using 'Wink of Stella' glitter pens, these little pens are just glorious to use. They make the images all sparkly!
 
 
Here is my album, taken in several photos.  Firstly, the front

 
 and the inside


Here are the products I have used on my mini-album :

 
 Little Claire 'Swirly Birds' stamp set
Cream and Pink card
Craft Creations 'Pink Dotty' paper
Craft Creations 'Pink Check' paper
Frilly Die # 3 in two sizes
Tim Holtz 'Rosette' Die
Wink of Stella Glitter Pens - Clear, Gold, Pink & Green
Tim Holtz 'Spun Sugar' inkpad
Memento 'Rich Cocoa' Inkpad
Magnetic clip
White pearls
 
This is how I put it together :
 
(1) Cut a piece of cream card to measure : 30cms x 12cms. Score at 12cms, 15cms and 18cms.


(2) Die cut three of the larger 'frilly' dies from cream card.
(3) Taking one of them, score in half and stick to one edge of the album.
(4) Cut three pink squares, 11.5cms x 11.5cms.
(5) Cut three squares, 11cms x 11cms from the 'Pink Dotty' paper, stick to card and then album.


(6) Cut two oblongs, 11.5cms x 2.5cms from pink card and two more, 11cms x 2cms from 'Pink Check' paper, stick together and then to centre panels of album.
(7) Onto remaining 'frilly' shapes, stamp up to of the images using 'Rich Cocoa' inkpad.


(8) Colour with 'Wink of Stella' pens and edge with 'Spun Sugar' inkpad, stick in album.
(9) Die cut from pink card, one 'frilly' shape. Cut in half and stick to top of album flap.
(10) Die cut 'Rosette' from 'Pink Check' paper.  Put together and stick to front.
(11) Stamp up 'heart' image onto cream card, colour in, cut out and stick to rosette.
(12) Stick magnetic clip inside flap and add pearls.
 
I do hope you feel inspired by my little album, thank you for any comments you may leave.
 
Heidi
and The Little Claire Team
xxx


Thursday 20 March 2014

We are at the NEC!

Steve arrived safely at the NEC yesterday and had a busy day setting up our stand, we think that he must be proud of his work as he has sent through some pictures of the end result, here they are, so if you cannot go then at least you can see what we look like at Hobbycrafts:


and more, this is at one end of our stand:


The show starts today running on until Sunday afternoon, and here are our first customers!


Fingers crossed for a good show, Steve will be happy - we have lots of lovely goodies on display.

We have received some more lovely cards from our teamies recently, here is a card from Marianne made using our RWAV 4 Seasons stamp set:


Marianne has stamped the Summer scene behind her window and has been clever in making the card appear to be the inside of the room, with wallpaper, a picture and even swags on the curtains!

Our teamie Diane has created a beautiful box card using RWAV Beach Huts stamp set, take a look at this:

can you see the lady peeking through the doors?
Here is the card in its full glory - see the suspended fence and the flowers - the great sentiment is included within this set too:


Hope you all have a good day wherever you are, Little Claire x


Wednesday 19 March 2014

Hello everyone


we hope you are all well and in good spirits, Steve has left today to go and set up our stand (C18) at the Hobbycrafts Show, Birmingham NEC which runs from tomorrow until Sunday, so we have all been very busy here getting him packed up and ready to go!  It now seems really quiet without him - he can be very noisy!

One of our teamies Helen N dropped in a lovely card she had made using our current club set 'Good Times'


We really like this card as it shows off all of the images within the stamp set plus some of the sentiments too - so thank you very much Helen for dropping this by!

Here is a selection of cards from our teamies:

designd by Doreen


designed by Marianne

designed by Helen R


designed by Lozzie
Lots of inspiration there and it's all go here as today we begin cutting and packing our new stamp sets ready to send out to our club members next week - would you like a sneak peek?

Yes or No - please let us know!

Little Claire x


Monday 17 March 2014

RWAV Competition Winner & Little Claire Likes - 'Happy Days'

Good morning from all here at Little Claire Towers!
 
Firstly, we must announce our competition winner from last Thursday, who will win a Little Claire - 'Room with a View' stamp set.
 
The winner is, drumroll .......
 
Debra Kenworthy, who wrote
 
''My favourite is Beach Hut. I live near the sea and I like to send cards with a seaside theme. There are so many uses for these stamps, humorous with doors open, doors shut for men and women, decoupage..... it's endless! Debra x''
 
Well done to Debra!
 
Please contact our lovely Carol (carol@littleclaire.co.uk), who will forward your
 
'RWAV Beach Huts'
 
set onto you.
 
Now to our regular Monday project, 'Little Claire Likes'
 
Today, we are showcasing a popular stamp set, 'Happy Days', which is great for male and female cards.  It has four main stamp images and a great circle sentiment.
 
 
Design Team member Heidi has made a card using the set and it can be purchased at the special price of £6.99 until Thursday, 20th March 2014, or whilst stocks last. Just click on the items below, the link will take you to the items on the website.
  
 
 Here is a list of products, used to make the card :
 
Promarkers - Denim Blue, Pear Green, Khaki, Pastel Beige, Sandstone, Caramel, Putty & Almond - £1.70 per pen
(Dies, scallop circle punch, brown pearls, peg, charm and scrap green card- from stash)
 
Card Instructions :
 
(1) Firstly, stamp up image onto white stamping cardstock, colour in.
(2) Die-cut shapes in kraft and green card.
(3) Stamp up sentiment onto kraft card using 'Rich Cocoa', punch out and add peg & cord.
(4) Cut a square of kraft card measuring 14cms x 14cms and one from the paper pack to measure 13.5cms x 13.5cms
(5) Stick together and down onto white card blank.
(6) Cut an oblong of kraft card, 14.5cms x 14.5cms. Add paper to fit.
(7) Attach hemp cord around oblong, secure well at reverse, stick down.
(8) Add small 'watering can' charm using more cord.
(9) Stick elements down together, adding pearls to corners.
 
We do hope you have enjoyed our 'Happy Day's' project today.  Please feel free to leave us a comment.
 
We will be sharing another project next Monday, we do hope you will stop by.
 
The Little Claire Team
 
xxxx


Saturday 15 March 2014

Little Claire Monthly Challenge # 43 - Make a Tag!

Hello and welcome to another great monthly challenge here at Little Claire.
 
We had lots of fabulous entries for our February challenge.  The winner of the prize is :

# 10 - Dee's Cards
 
Here is her winning entry :


Well done!
Please contact our Carol (carol@littleclaire.co.uk) who will forward on your prize.
 
Our theme for this month is 'Make a Tag'.  You can go with the tag shape or include a tag on your entry somewhere. 
 
You could win these wonderful goodies, here is our prize for March
 

4 x 6 x 6 Red dots on white Paper
4 x 6  x6 Pink Meadow narrow stripes Paper
4 x 6 x 6 Green & Blue Stripes Paper
4 x 6 x 6 'How Sweet' - double sided paper
1 sheet of 24 Circular Sentiment Greetings
5 x Assorted A4 design sheets
8 x Assorted Concertina Tag Cards
1 x 'You’re so Tweet' Stamp
1 x Me to You 'Teapot' Stamp
1 x Me to You Assorted Ribbons
 
Here are our Design Team makes, feast your eyes on their 'Tag's'
 
Diane using 'Sweetest Wishes' & 'Bunting' stamps


Doreen using 'Butterfly Flourish' stamp set


Gaynor using 'Flowerhead' Dinkie stamp


Helen Nile using 'Good Times' March Club Stamp set


Helen R has used 'Let's Do Lunch' stamp set


Lozzy using 'Good Times' March Club Stamp Set


Marianne using 'In the Garden' stamp set


There are a few rules to follow when entering our challenges,
 
Can we please ask that your card/creation is an original design of your own and not a copy or remake of another card. This is plagiarism and these entries WILL NOT be included. 
 
(1) You DO NOT need to use a Little Claire stamp to qualify for the prize draw.
(2) Only those using Little Claire stamps will qualify for a Top 3 badge.
(3) You may enter the challenge UP TO 3 TIMES ONLY PLEASE and you may combine with other challenges.
(4) You MUST follow the challenge theme and NO BACKLINKING please, new cards only.
(5) Please provide a link to our blog in your post.
(6) Please leave a link (via link below) to your actual card, not just to your blog.
(7) Please turn off Word Verification on your blogs, it makes it so much easier & quicker to leave a comment on your blog.
(8) The challenge finishes on Friday, 11th April 2014 @ 16.00pm and the new challenge (#44) will be open on Saturday, 12th April 2014.
 
We look forward to seeing all of your entries.  Please leave us a link below, so that we can come and see what you have made.
 
Enjoy making your 'Tag' cards,
 
The Little Claire Design Team
 
xxxxx


Friday 14 March 2014

Weekly Blog Project - It's All Double Dutch to Me!


Good morning everyone - it's Helen N here with this week's blog project.  I've made a double dutch fold card using the very cute 'Daisy Bear' stamp.  It's a very easy card to make - this is what you'll need:

peel off sentiment

and this is how you make the card:


1. To make the card base, you need to cut two pieces of white card.  The first piece measures 25cm by 11.5cm.  With the longer edge towards you, score at 10cm  and then turn the card round.  Fold the shorter flap down- this is the piece on the left in the photo above.  The second piece measures 24cm by 5cm.  With the longer edge towards you, score this piece at 6cm and 18cm and fold the two end flaps as shown on the right in the photo above.


2. Put the smaller strip to one side and attach paper to the inside of the larger card - I used a kraft layer measuring 14.5cm by 11cm followed by a piece of pink patterned paper measuring 13.5cm by 10cm.


3. Next, attach paper to the shorter front flap (above) - I used a kraft layer measuring 9.5cm by 11cm followed by a piece of pink patterned paper measuring 8.5cm by 10cm.


4. To make the card stand up, the smaller piece of card now needs to the attached to the back of the decorated piece.  The photo above shows the two pieces stuck together - the smaller piece 'wraps' round the other piece.  I have attached paper to the smaller panels which will be seen from the front of the card as shown in the photo below.  I used kraft paper measuring 5.5cm by 4.5cm and pink patterned paper measuring 5cm by 4cm


This is how your card base should look (photo above).


5. To finish the card, stamp 'Daisy Bear' on to a piece of white card measuring 8cm by 6cm using the Tuxedo ink pad and then colour using Promarkers.  Mat this on to a piece of kraft paper measuring 8.5cm by 6.5cm and then attach this to the front shorter flap.  I added a peel off greeting and some gems and two punched hearts on the two smaller panels.

Here's another example of the same type of card using 'Butterfly Blossom'.


I hope you like my card project and that hopefully this card shape is no longer Double Dutch to you!

Helen N xx