Tuesday, 20 September 2011

Weekly Project - Treat Bag

It's time for another weekly project and this week's tutorial comes from Donna who has made this gorgeous treat bag using the Penguin Stuart stamp which is available on the website here at only £3.50.

To begin you will need a piece of card 6.5 inches by 6.5 inches - score on the blue lines and cut on the red lines as shown in the photo below:

Stick front of A to back of B, sandwiching 1 in between, then stick front of C to back of D, sandwiching 2 in between. You will then be left with a box shape as shown in the photo below:
Die cut 2 largest labels (Donna has used Nestabilities Labels 23) out of card and then the next size down out of patterned paper.  Also, die cut or punch a strip of A4 card for handle as shown in the photo below:
Stick the handles to the sides of box and the labels and patterned paper to the front and back as shown in the photo below:
Stamp Penguin Stuart, colour and fussy cut him or her out - Donna has made a girly one!
Stick Penguin Stuart on the front of the bag and decorate with die cut snowflake and sentiment.  Add two bows to handle.

Fill with sweeties!

What do you think, girls?  We'd love to hear your comments!

Monday, 19 September 2011

A Day with Little Claire!

A big thank you to everyone who came to our day of classes at Thornton Hough on the Wirral at the weekend.  We hope everyone enjoyed the day - we certainly did!

Everyone who was there attended three different classes with three of our Design Team members Gaynor, Helen R and Helen N and you can see everyone hard at work in the photo above!  There were plenty of refreshments during the day, a raffle (a big thank you to our sponsors for the great prizes) and of course the opportunity to do some shopping too.

This is one of the cards Gaynor made with her classes using "Ever So Lovely" - a gorgeous stamp which is one of the big launch of new designs in November so you're getting a sneak peak!
And this is one of Helen R's cards made using the very cute 'Armful of Wishes' - a really versatile stamp suitable for so many occasions.
And finally, one of Helen N's cards using the "Will He Find Us?" stamp.

We will be organising another day of classes soon and if anyone hasn't booked their place yet, there is a Day With Little Claire at Crawley on 15 October - you can find more details here.

Friday, 16 September 2011

Just before I go to bed........

.......... I must show you a gorgeous card created by our DT Louise;

What a beauty!  Thank you Louise, I love this design it shows our 'Good Morning Robin' so well, such detail, one of our favourite designs.
Good night everyone, big day tomorrow for our day with Little Claire on the Wirral, will post photo's of our classes and share our cards very soon.
Hugs
Little Claire x

Red Gingham Christmas Die Cut Sheets - New on the Website!

New today on the website are the Red Gingham Christmas A4 Die Cut Sheets - have a look here for more details.

Each sheet has six different die cut designs - all pre-coloured and ready to put on your cards.  They're great if you're making lots of cards or need to make something at the last minute.

One of our Design Team members, Donna, made some gorgeous samples at the Harrogate Show using two of the dies cuts.  In the photo above you can see a beautiful shaped card and below a twisted easel card.
Keep an eye on the website next week for more exciting stock and even more gorgeous cards and inspiration!

Harrogate Show

It was lovely to see everyone at Harrogate last weekend and we hope you enjoyed the show!  One of our Design Team members, Donna, was demoing on our stand making a range of gorgeous cards using our Red Gingham Christmas designs.  Here are a couple of examples of what she was making.

This first card (above) was made using the 'Cold Crisp Kisses' stamp - Donna's very clever card folds flat for sending and then pops open to display the gorgeous design.
And this second card uses the beautiful 'Good Morning Robin' stamp and one of our centre step cards which are all pre-cut and pre-scored to making creating the perfect card even easier!

Sorry we're a bit late posting this but we're all busy preparing for our big day of classes tomorrow at Thornton Hough on the Wirral - we're looking forward to seeing everyone and we'll have photos of the big day to share with everyone next week!

Monday, 12 September 2011

Weekly Project - Time for a Hug!

I hope everyone enjoyed the weekend and that those of you who were at the Harrogate GNPE had a great time - it was a fabulous show and it was lovely to see everyone there!

So, it's the beginning of another week already and time for another weekly project from one of our Design Team members.  This week's project is from Helen Nile and uses our very cute owl set "The Right Time" which you can find here on the website plus the matching circle sentiment from "Claire's Sentiments" which you can buy as a stamp set here or as part of our die cut sentiment pack here.

Card Ingredients:
“The Right Time” stamp set and “Claire’s Sentiments” stamp set
Square 6” card blank
White card
Pink and tan gingham papers from Little Claire
Dark brown card
White Card Candi
Circle and scalloped circle dies

And here are the instructions:

1. Place the square card blank in front of you open, with the long edges at the top and bottom.  Score a line diagonally across one half of the card blank from the central fold to the top corner and then fold
2. Open the card out again and decorate the panel that is not folded – this will form the base of the easel card.  Layer the dark brown card, tan gingham paper and pink gingham paper as shown.
3. Cut a panel of card which is the same size as the card blank (ie 6” square) and decorate in the same way as the base – this is the top of the easel.

4. Stamp the larger owl image from “The Right Time” set and then die cut the stamped image using the circle die.  Stamp the matching circle sentiment from “Claire’s Sentiments” and die cut with the smaller circle die.  Die cut scalloped circles to match both of these from dark brown card.  Stamp one of the flowers (from the branch) in “The Right Time” set and carefully cut this out.  Colour the images using Promarkers.  The colours used are shown in the photo below.
5. Glue the single flower to the circle panel as shown on the final card and stick the circles and scalloped circles together.  Stick the larger circle and scalloped circle in the middle of the top panel.

6. Stick the front panel of the card to the folded part of the card blank  being careful to only stick it to one half of the folded panel – make sure you have the right panel by testing how the card will look folded up before sticking the front panel down.

7. Attach foam pads to the sentiment scalloped circle and then stick this in the bottom corner of of the pink panel of paper on the base using the photo at the top of this post as a guide - this will act as the "stopper" and keep the front panel standing up.  Finish with white Card Candi coloured with Sandstone and Pink Carnation Promarkers.

Hope you enjoy this week's project!

Saturday, 10 September 2011

Little Claire Monthly Challenge # 13 - 'Black & White' Theme

Good morning, welcome to another challenge. Thank you to all of you who took part in the Little Claire's August challenge, we had a huge response once again and it was so lovely to see so many wonderful cards.

Our winner this month, chosen by random organiser is :-

Judy - Well Done Judy!!! Your card was gorgeous!

Please contact Gill/Carol @ info@littleclaire.co.uk and they will forward on your prize.

Our Top Three are :

Diane
Sylvia
Anne


Well done ladies! Please copy the badge from the side bar, for your blogs.


Now onto September's challenge, we would like to see your Black & White creations. They can be cards, scrap pages or projects. You do no have to use a Little Claire image to join in, but if you do, you can also be in with a chance of being chosen for our Top Three.

Here is the prize for the lucky winner of this month's challenge, wow what wonderful goodies!


It consists of: 4 x Christmas baubles paper, 4 x Jingle bells paper, 4 x Crimson Bazzilll, 4 x Pine Bazzill, 1 x sheet handmade stickers, 1 x sheet Red Gingham die-cut Christmas sentiments and 1 x Little Claire Poinsettia Corner stamp

Here are the Design Team creations, aren't they fabulous? Please leave us a comment, we love to receive them.


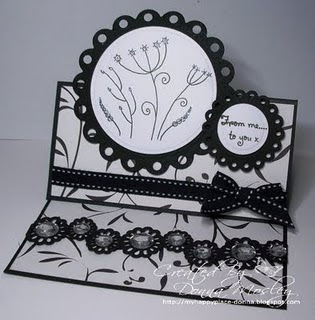
Donna using 'Spikey Flower Set' & sentiment from 'Gerbera' set


Gaynor using 'Daisy the Campervan' image & Red Gingham Sentiment stamps


Georgina using Red Gingham 'Oh Christmas Tree' & Sentiment stamps


Heidi using 'Spikey Flower' image, Red Gingham Circle Sentiment & LC Die-cut Circles


Heike using 'A Little Bird told me' Stamp set.


Helen N using 'Single Flower' image & Peel-off from 'Butterfly Tree' set


Louise using 'Christmas Westie' stamp


To enter the challenge, there are a few rules to follow :

•You DO NOT need to use a Little Claire stamp to qualify for the prize draw
•However, only those using Little Claire stamps will qualify for a Top 3 badge
•You may enter the challenge UP TO 3 TIMES and you may combine with other challenges
•You must follow the challenge theme and NO BACKLINKING please, new cards only
•Please provide a link to our blog in your post
•Please leave a link (via link below) to your actual card, not just to your blog
•The challenge will close at 6pm on Friday, 7th October 2011, the winner/top three will be announced on Saturday 8th October 2011 along with Challenge # 14.

Good luck and thanks for joining in!

The Little Claire Design Team


xxxxxxxxx


Tuesday, 6 September 2011

Little Claire's Weekly Project - Made for Men!

Hello everyone, thank you for all of your lovely comments regarding our first Weekly Project, last week. Here is another one for you, using our 'Made for Men' stamp set. Our Design Team member, Heidi Green has designed our project, (click on the link to see her blog). This stamp set is so versatile, it has lots of great elements to play with and has two different sentiments.


Card Recipe :
'Made for Men' stamp set - Little Claire
14 x 14" White Card Blank
My Mind's Eye Paper 'Portabello Road' Paper
Light Brown Card
Inks : Black Momento & Vintage Photo Distress Inks
Promarkers Used : Vanilla, Tan, Caramel, Crimson, China Blue, Cool Grey 3, Ice Grey 1 & Ice Grey 2
Brown Card Candy
Linen Thread
Glossy Accents

Instructions :
1. Firstly, cut out a square measuring 13.5 x 13.5 inches, another measuring 13 x 13" of MME paper. Ink around edges of white card blank and square of card and paper using Vintage Photo ink pad.


2. Using black Momento inkpad, stamp out bottle/glass, shoes & book/glasses images onto white card. Leave an edge around images and cut mats of brown card, slightly larger thank images.


3. Colour in with Promarkers. Ink around edges as before and doodle a black line around images.


4. Stick down brown card and paper square onto white card blank. Then place and stick matted images around the card at angles. Add two brown card candy to left of project.


5. Wrap around linen thread twice and tie a bow towards the top of the card. Add glossy accents to bottle, glass, shoe tips and glass lenses and leave to dry.

Hope you have enjoyed this week's project, please leave us a comment below.


Happy Tuesday!

Thursday, 1 September 2011

September Club Set - Delivering Christmas Wishes

New on the website today is the great September club set of stamps called "Delivering Christmas Wishes" - you can see all the details hereThe images in the set are a postbox, a Morris Minor (complete with Christmas tree and presents!), four very cute little robins and two sentiments.  It's a really versatile set and will give you plenty of scope for making lots of different Christmas cards!

If you aren't a club member then this is how it all works: each month you will receive a new Little Claire stamp (or set, we vary each month) and pre-cut materials to make a card together with instructions and colour project ideas. You will be given your own unique Little Claire membership number which will entitle you to 10% discount from all your purchases with us either online, by phone or at shows (whilst a member).  If you're interested, simply add the September set to your basket when you're shopping to receive your first pack and contact us if you wish to join.

The card which you can make with the materials included in the September club pack is this one:
Also on the website, you will find lots of gorgeous cards made by the Design Team to give you some more ideas and inspiration - just click here to go to the gallery. Finally, you can also see the cards plus a short demo of how to make the club card in our new video which you can find on the website here.

5 lucky winners (and the sun is shining here)......

Hello lovely peeps - and it's great to say that the sun is shining on us here, wonderful after so many grey days.......
Great to read your comments regarding our WEEKLY PROJECTS, we are looking forward to giving you lots of inspiration and the DT girls are already inking their stamps and folding their cards ready for this weekly challenge.....
Now to the good bit; here are the names of the lucky 5 drawn at random by our cat Elsie:
Daisychain   anne    Cally   Lynn   Susan....

Thanks for writing in girls, we do appreciate your time to write comments, here is your prize:

'Oh Little Town of Bethlehem' stamp by RED GINGHAM DESIGNS, 4 pots of Glitter and 5 A4 sheets of Kraft Card will be sent to you once you contact Carol carol@littleclaire.co.uk with your addy's.  Love
Little Claire xxx