Monday, 25 June 2012

Here it is!

The first of 2 new Christmas Designs from Little Claire this week:
Christmas Owl Tree
How do you like our gorgeous Christmas Owl Tree stamp?  Isn't it so lovely?  Such a great idea for your cards and here are a selection designed by our DT's:
from Donna
from Gaynor
from Maxine
from Georgina
from Heidi
from Helen R
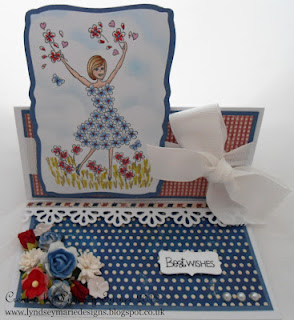
and from Lyndsey
'Christmas Owl Tree' is the first of a new range of Christmas designs from Little Claire,  (note to our club members, an exclusive offer will be included in your club pack this month so don't order this stamp yet!) we will show you our second design on Thursday, in the meantime, if you fancy winning this stamp for your stash, just leave a comment telling us how many owls you have counted on this tree and why you would like to win and we will draw the lucky winner on Thursday 28 June! 
Best of luck
Little Claire x

Friday, 22 June 2012

Weekly Project - Die Cut Jubblies!


Hello everyone!  This week it's my turn (Helen N) to host the weekly blog project and I'd like to share an easel card with you.

Everyone knows that Little Claire is famous for excellent quality, unique stamps but have you also seen the fantastic range of die cuts on the web site?  There's a great selection of images plus a wide choice of sentiments - they make wonderful cards.  

The image sheets are fabulous value at £1 for a sheet of six images - there's also a special deal on the website to get 6 sheets for £5 - have a look here for more details.

I'm using two of the images from the Lovely Jubblies die cut sheet which you can find here on the website.  The images are square with rounded corners when you pop them out of the sheet but they don't have to be used like this - they work really well with cutting dies for a different look.  

A little tip - use low tack masking tape to keep your cutting die in place when you cut the shape.  Make sure you put your tape on the die itself and then on the image panel outside the circle - that way there's no danger of the tape taking the surface off the image panel.  Even if you use really low tack tape, as the die runs through your cutting machine the tape gets pressed on to the panel and there's nothing worse than cutting a perfect shape only to find the tape takes the surface off your image!

So, on to my project.  Here's what you'll need:


red and navy blue card
Little Claire Die Cut Sentiments 
card blank 10cm by 20.5cm
circle and scalloped circle dies
foam pads
corner rounder punch

And here's what you need to do:

1. Choose two of the images from the sheet and die cut them using a circle die.  Die cut a matching scalloped circle from navy blue card.  Stick these together and then mat on to a piece of red card measuring 9cm by 9cm - round each of the corners on the two pieces of red card.

2. Open out the card blank and lay it flat.  On the top half measure in 9cm from each side and then draw a line from the spine of the card to the top of the front panel (as shown in the photo).  Cut down each of these lines and then along the spine between the lines.

3. You will then be left with a split top panel - fold each of the pieces in half as you would do to make a normal easel card.

4. Fold the two panels back and then decorate the inside of the other panel to form your easel base - I've used red and navy card and then matted a piece of red spotted paper.  Then I put a strip of navy paper matted with some of the striped paper across the top layer, using the spots as a guide to get this layer straight.


5. Choose two of the die cut sentiments, colour them and then attach to the paper strip with foam pads.  Attach your image panels to the top folded panels on the top of the card and then finish with white Card Candi:


And here are two more cards I've made with some of the other gorgeous Little Claire Die Cuts:

 .

First of all, from the Cutie Patootie sheet, also using one of the Little Beauties die cut tags.


Have a look on the website to see more A4 die cut sheets and also in the 'sentiments' section to see the die cut sentiments.

And finally, a quick reminder that our latest "Jubilee" challenge is still open for entries and the prize for the winner is a set of the great new 'Dictionary Definitions' stamps - you can find all the details plus inspiration from the Design Team here

Hope you've enjoyed today's project!
Helen x

Thursday, 21 June 2012

Cards from Customers

Two lovely customers have today sent in their cards made with Little Claire designs to share, here is a card made using our Man Squares stamp set, this set includes the main 4 square images and the circular sentiment: 
Man Squares - designed by Jenny Parkes
and here is a card made using our Silhouette Cats design:
Silhouette Cats Stamp Set £5.50
Silhouette Cats, designed by Dawn French
Thank you to Jenny & Dawn for your cards.

We have just finalised the last of our new Christmas designs and it doesn't feel odd working with them what with all the rain that is falling outside, we have even had to put the lights on today!
But we have a super selection of ideas to show you soon, we will post our first two newbies on here next week together with some great samples from our trusty DT's.
Little Claire x

Wednesday, 20 June 2012

Changing Tree

A couple of weeks back we attended the StampMagic show at Doncaster Dome with our lovely Donna who demonstrated our  Changing Tree  stamp set 
This set is so versatile and gives you the basic tree trunk with lower branches and then you also have 23 stamps with which to make up your trees (you can make an Owl Tree, Music Tree & Wedding Tree) or, just use the stamps separately to make your own designs!
26 stamps in total for just £8.99!

As promised, here are a selection of cards Donna made with this lovely set:


and here are a couple more cards from our DT's:
Wedding Tree, designed by Georgina Sweetenham
You can see here that Georgina has used the wedding themed embellishments from the set to make this gorgeous Wedding Card and also the clever use of our Bunting stamp set spelling our 'Wedding Day'
Music Tree, designed by Helen Nile
and here Helen has used the music themed embellishments from the same set to create a lovely 'Music Tree' card
Owl Tree, designed by Heidi Green
and above, our Heidi has used a selection of the owl stamps from the Changing Tree stamp set together with a couple of the wedding & music stamps too!
So, all in all our Changing Tree really is a remarkably versatile set of stamps for just £8.99

Little Claire x


Tuesday, 19 June 2012

Quick Cards made easy - on sale NOW!

The new issue of Quick Cards made easy is on sale now and you can see Steve on the back page together with a fabulous card project designed by our own Helen Holbrook made using our Footballing Hedgehogs  
We've even managed to include a piccie of our Ginny Cat who is sitting in the smallest box possible, keeping an eye on our card samples and choosing her favourites!
We would love to know which magazines you either subscribe to or buy as this will help us with our advertising campaigns, do leave a comment and let us know.

Little Claire x

Saturday, 16 June 2012

Little Claire Monthly Challenge # 22

Good morning, welcome to another challenge at Little Claire's.  Thank you to everyone that entered last month, we had some really colourful entries from which a winner needs to be chosen, and that is :

Susan's Card Creations (#15)

Well done Susan, please contact Carol @ littleclaire.co.uk who will forward your prize.
To our top three, please feel free to take the blinkie from the side-bar and display on your blogs.

Isabelle (#5)
Caroline (#70)
Heidi (#118)

Our new challenge is themed 'Jubilee', which is just right for the recent 'Jubilee' festivities, ongoing football and forthcoming Olympics and Paralympics. We would like to see images, red/white/blue papers and any embellishments that show these celebrations.  We do have a few rules to follow when entering our challenge, please see the rules at the bottom of this post.

Our prize this month is a great set of sentiment stamps called 'Dictionary Definitions', worth £12.99.


To our Design Team creations, we have all used Little Claire designs, which can be purchased via the website.

Donna using
'Loverly Jubblie' - 'Daisy with Bunting' and sentiment


Gaynor using
 'Cars' and 'Dictionary Definitions' images


Gemma using
'Loverly Jubblie' - King Robert & Queen Daisy and sentiment


Georgina using
'Lovely Jubblie' - 'Robert & Daisy Umbrella'


Heidi's using
'Loverly Jubblie' - 'Daisy Bunting', 'Sunshine Sentiment' and
Stitches & Button stamps


Helen N using
'Loverly Jubblie' - 'King Robert & Queen Daisy' and 'Bunting' stamps


Helen R using
'Loverly Jubbliee' - 'Travelling Daisy' image


Lyndsey using 'Jo  De Vivre' image


Maxine using
'Loverly Jubblie' - 'Travelling Daisy'


Our Challenge Rules :
(1) You DO NOT need to use a Little Claire stamp to qualify for the prize draw.
(2) Only those using Little Claire stamps will qualify for a Top 3 badge.
(3) You may enter the challenge UP TO 3 TIMES ONLY PLEASE and you may combine with other challenges.
(4) You MUST follow the challenge theme and NO BACKLINKING please, new cards only.
(5) Please provide a link to our blog in your post.
(6) Please leave a link (via link below) to your actual card, not just to your blog.
(7) Please turn off Word Verification on your blogs,it makes it so much easier & quicker to leave a comment on your blogs.
(8) The challenge finishes on Friday 13th July @ 18.00pm and the new challenge (#23) will be open on Saturday14th July 2012.
Good luck and we are all looking forward to popping by your blogs to see your entries.

The Little Claire Design Team
xxxx

Friday, 15 June 2012

Weekly Blog Project - Shadow box card

Good Morning everyone, Donna here, it's my turn to do a tutorial here at Little Claire's. As there seems to be a lot of people getting married now, I thought I would make a wedding card.


You will need: A4 piece of card
Sentiment Mix stamp set
Gold Mirror card
Martha Stewart border punch
Spellbinders Circles & Scalloped Circles, Bitty Blossoms and Floral Flourishes dies
Promarkers - Black, Ice grey 4, 2, 1, Blush, Mustard, Pastel Yellow,Burnt Sienna, Caramel, Sandstone & Satin
Cream paper ( to make the flowers with Bitty Blossoms)
Adhesive pearls

Using the A4 pice of card, cut 2 pieces measuring 21cm x 14.5cm.
Then score as shown below at 3cm, 5.5cm, 15.5cm & 18cm


 Cut off 1.5cm off each of the ends of one of the pieces, this will be the back of the shadow box.

Then using a Martha Stewart punch, punch a border down each end of the other piece (the front)  and using  a plain circle die cut a hole in the centre section, as shown below.


Stamp out the wedding couple on a piece of stamping card measuring 14cm x 9.5cm and colour using Promarkers.


Fold the back of the shadow box as shown and stick in the image as shown below.


Fold the front as shown below.


Then stick the front to the back (wet glue is best) as shown below.


Cut out a scalloped ring in gold mirror card, stamp & cut out a sentiment & scallop circle in gold mirror card as shown below.


Stick to the front of shadow box and then decorate with gold mirror flourishes & flowers made from bitty blossoms. Add adhesive pearls as shown to finish.


A side view to show depth of card.


I hope you have enjoyed my little tutorial and if you do have a go at making your own shadow box card, let us know as we would love to come and have a look.

Thank You from all at Little Claire Design's
Donna xxx