Sunday 30 November 2014

Here's a sneak peek...

...for all of our lovely blog followers - here is the first unveiling of our new set of Club Stamps for December!

May we present 'Man of My Dreams' 

This set of stamps is sure to come in very handy for all those pesky cards for men, whether you have a hubby, brother, uncle, son or a 'Knight in Shining Armour' (was he brave enough to tackle that big spider in the hallway?!)
We love these little guys and our club members receive all the materials to make TWO cards in their packs this month; here are the two cards to make:

and...


Both cards designed by our Heidi and for more details of how to join our club click here, hope you have a lovely day wherever you are and whatever you are doing...

Little Claire x


Friday 28 November 2014

Friday Blog Project - Advent Gift Calendar


Good morning everyone - it's Helen N here with this week's Friday Blog Project and I've made an Advent Gift Calendar.  It's perfect for making a special gift for a crafter and is very easy to make.

To make the project you will need:

Christmas sentiment stamp - I've used one of the sentiments from the 'Snowman Stamp Set' which is here on the website
Tuxedo Black Memento ink pad
25 money envelopes made of brown paper
patterned paper 
2 book rings (or ribbon)
Promarker in a darker tone to the paper you've used
gifts to put inside your Advent Calendar.

And this is what you need to do:

1. On each money envelope, tuck the flap inside the envelope as shown in the photo below.  The money envelopes I have used measure 10cm by 7cm.


2. Cut a piece of patterned paper to cover each of the envelopes - my pieces of paper measure 9.5cm by 6.5cm.  You need to use pale patterned paper because the stamping is done directly on the paper.  I've inked round the paper and the envelopes very lightly with an old brown ink pad.  Attach the paper to the envelope as shown in the photo below:


3. Punch two holes in the closed end of the envelope as shown in the photo below:


4. Using your first envelope as a guide, punch holes in the remaining envelopes.

5. Use the numbers from the 'Letters Snow' set to stamp 1 to 24 directly on the patterned paper using the Memento ink as shown in the photo below:


6. On the last envelope stamp a sentiment as well as the number 25:


7. Colour in the snowflakes on the numbers using a pen in a darker tone to your paper.  I've used a Denim Promarker with my pale blue paper.

8.  Join the envelopes together using two book rings (or ribbons) - the finished Calendar will stand up as shown in the photo below:


Some ideas for the contents - Little Claire Dinkies stamps (they are here on the website), a sheet of gems or pearls, a short piece of ribbon folded up, a little bag of Card Candi and for the Christmas day a Little Claire gift voucher!

Here's the side of the calendar showing some Dinkies in a few of the pockets:


and here's the main view again:


I hope you've enjoyed my little project!


Thursday 27 November 2014

New Dinkie Paper Pads!

Do you know we have two new Dinkie Paper Pads?

Dinkie Dots
Dinky Dots and Dinkie Ginghams, each pad contains 10 colours, 4 sheets of each colour (40 sheets p/pad), all for just £2.99!

Dinkie Gingham
These pads are sized at 8cm x 8cm and fit just inside our white and kraft blank dinkie cards, perfect for layering up your creations.

And we have a winner!

From our competiton last Thursday when we showcased our new 'What if I fall?' stamp set

and we asked you to comment and let us know what you are scared of, thank you to everyone who entered and the winner drawn at random is:

Vinita Jain who said: I am afraid of Lizards, horrible scene created!!

Well done Vinita, please contact Gill with your address and we will send your 'What if I fall?' stamps to you, and we must remember not to make any Lizard stamps lol x

designed by Heidi
Little Claire x


Tuesday 25 November 2014

Well, that's it...

...the 25 November, so four weeks to go until the big day - how has this happened, have any of you started Christmas shopping yet?  We haven't and we are sure we are not alone in saying how fast this year has sped by, but enough of Christmas, we want to show you two new Dinkie stamps recently released: Dinkie Squirrel and Dinkie Pops, both costing just £2.00 each:


designed by Helen N


designed by Heidi


And here is our Dinkie Pops stamp, again just £2.00:


designed by Shary


designed by Gaynor
Would you like to win one of each stamp?

Leave us a comment telling us what the first Christmas present is you have bought this year (or are about to buy - it may give us some ideas!) and we will announce the lucky winner next Tuesday 02 December, good luck!

Little Claire x


Monday 24 November 2014

Little Claire Likes - 'Made For Men' Bookmark

Hi and welcome to another 'Little Claire Likes' weekly project.  Each Monday we showcase a small tutorial using one of our favourite stamp sets.
 
Today, is the turn of a great male themed stamp set called 'Made for Men'
 
 
It comes with three great images and two sentiments, that mix and match well together.
 
You can purchase this great male set for the special price of £4.50 (normally £6.50) for a limited period only, until Thursday, 27th November 2014.
 
Heidi has made a bookmark using the set.  She has stamped up some of the images and has added some glossy accents to a set of brogue shoes.
 
 
Here is a list of products used on the bookmark, most of which can be purchased from the website HERE.
 
Product List
 
White, blue card and Promarker's from stash
Double-sided tape and sticky pads
 
Bookmark Instructions :
 
(1) Cut the kraft card to measure : 15.5cms x 6.5cms.
(2) Cut the blue card to measure : 15cms x 6cms.
(3) Cut a piece of white stamping card to measure : 14.5cms x 5.5cms.
(4) Stamp up images randomly, using a brown and blue inkpad from the set.
(5) Stamp up 'shoe' image onto white card, colour in using brown Promarker's.
(6) Cut shoes out and cover with glossy accents. Put to one side to dry.
(7) Cut three small pieces of ribbon and stick to back of blue card as shown.
(8) Stick oblong image down onto white card, then onto kraft piece.
(9) Punch a hole in the top of the bookmark, thread ribbon through and tie a bow.
(10) Once dry, stick shoes down onto bookmark.
 
We do hope you like the tutorial that we have shared today. They make great stocking fillers!
 
The Little Claire Team
 
xxxxx


Saturday 22 November 2014

Weekly Blog Project - A Christmas Plaque

 
Christmas Plaque by Shary
 
 Hi Shary here and today I'd like to show you how to make a pretty Christmas plaque using one of my favourite Little Claire Christmas stamps, Star of Wonder.
 
 
Products Used:
Little Claire "Star of Wonder" digi stamp
Little Claire Glitter self adhesive film
Little Claire Snowflakes on pale blue papers
White and pale blue card
Wow embossing glitter powders or glitter
Collal glue
Pale blue ribbon
MDF shape
Ink
Colouring medium
 
 Instructions:
 (1) Take your MDF shape , I have used a 15cm x 12.5 cm rectangular one
and cover with the snowflake paper. I used Collal glue as it's nice and strong. Turn the plaque over and trim off the paper using a craft knife.
(2) Ink around the edges with a contrasting ink.
(3) I've used a Star of Wonder image but you can decide which image you would like to use. Using a digi image means that you can size it correctly to fit your plaque.
 
(4) Colour your image and then cut it out. Add some sparkle (glitter or glitter embossing powder) to his scarf, the snow and star.
 
(5) Find a sentiment that you like and then add more sparkle for that extra Christmassy feel.
 
(6) Adhere your image and sentiment to the plaque.
 
(7) Cut a piece of the glitter self adhesive film to size so it fits over your plaque. Peel of the backing and lay over your plaque.
 
(8) Rub over the film with your fingertips making sure you press firmly around the image and sentiment to remove all the creases.
 
(9) Turn plaque over and cut off excess glitter film with a craft knife.
 
(10) Add some lovely contrasting ribbon so you can hang your plaque.
 
Hope you have enjoyed my blog project today.
 
Shary x

Tuesday 18 November 2014

'What if I fall?...'

'Oh but my darling, what if you fly?'

What gorgeous words of encouragement, so lovely that we just had to design a stamp to go with this text, so may we introduce our new 'What if I fall?' stamp set:

and our teamies couldn't wait to get creative, the clouds are seperate within the set and Gaynor has used them to good effect on her card below to give perspective:

designed by Gaynor
Helen N has given us a pink version:

designed by Helen N
and a blue version:

designed by Helen N
and here are the stamps in black & white, a striking card by Heidi:

designed by Heidi
Marianne has given us a beautiful bluebird:

designed by Marianne

a circular card from Diane:

designed by Diane
and finally Shary has split up the text and paper pieced the birds - love it!

designed by Shary
So there we are, this is one of our new releases, we will share some more over the next couple of days

Would you like to win this stamp?

Just leave us a comment, loosely based upon the theme 'what if I fall?' - telling us what you are scared of...

Gill is scared of SPIDERS!

Carol is scared of SPIDERS!!

Steve is scared of HEIGHTS and SHARKS?!

We'd love to read your comments and we will announce a winner of this new set next Thursday 27 November.

Good Luck x


Monday 17 November 2014

Little Claire Likes - 'Snowman Bunting' Christmas Wreath

 
Hello and welcome to another 'Little Claire Like's' Monday blog project.
 
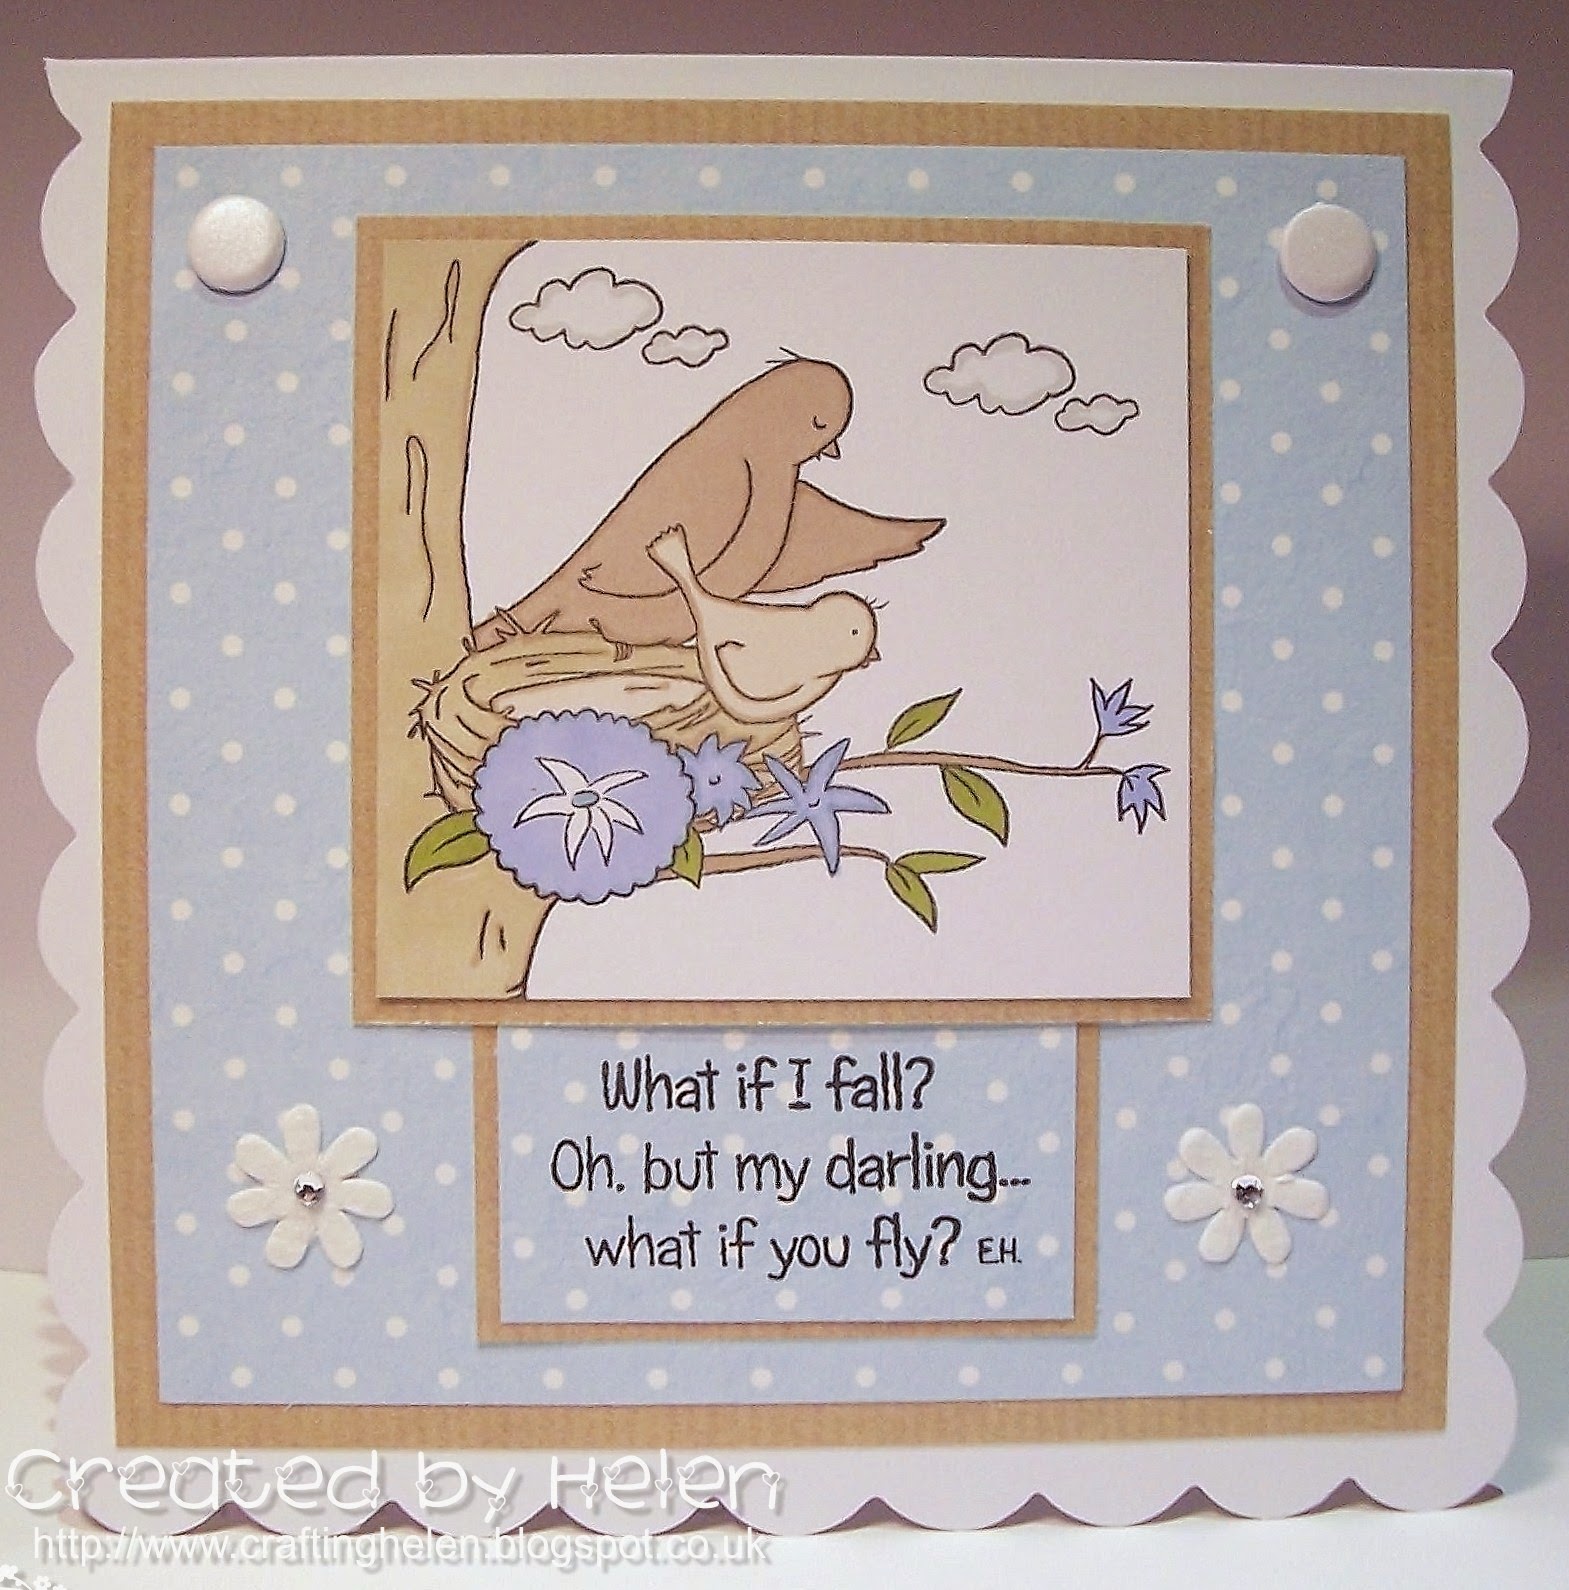
Our chosen stamp this week is 'Snowman Bunting', it is another one of our Winter/Christmas stamps that is very cute!  It has a great sentiment included in the set, 'Christmas Celebrations'.
 
We are offering the stamp, on our website HERE at the reduced price of £3.50 (usually £5.50) until this Thursday, 20th November 2014.
 
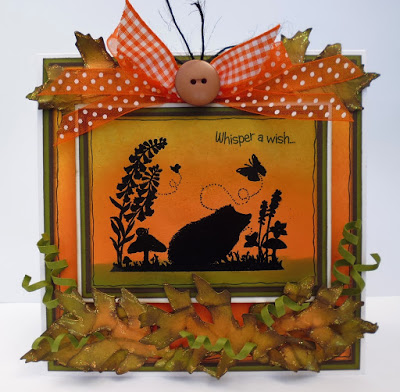
Here is Heidi's make for today, she has created a Christmas wreath using the set with lots of snowflakes. She has used our great winter alphabet - 'Letters' Snow', to spell out 'Snowman' around the wreath.
 
 
Products Used :
 
White and Turquoise card
Circle dies in two sizes in two sizes
Snowflake punches, one large, one small
Turquoise ribbon and pearls
Double-sided tape
Sticky Pads
 
Wreath Instructions :
 
(1) Firstly, die cut two large circles from turquoise card.
(2) To the reverse of one of the circles, attach some ribbon in a loop, stick down.
(3) Stick remaining circle over ribbon, onto card and stick down.
(4) Die-cut a circle from white card, stamp up 'Snowman Bunting' image.
(5) Colour in using pens of choice and stick down onto circles.
(6) Punch out nine large snowflakes from turquoise card and two small ones from white card.
(7) Stamp up 'S,n,o,w,m,a,n' using 'Letter's Snow' alphabet onto white card, cut out all letters.
(8) Edge all white card using inkpad.
(9) Attach letters individually to snowflakes, stick to wreath.
(10) Add blue pearls to white snowflakes.
(11) Add Stickles and leave to dry.
 
We do hope that you have enjoyed our 'Wreath' tutorial today.
 
The Little Claire Team
 
xxxx


Friday 14 November 2014

Friday Blog Project with Little Claire

Morning everyone, Tis my turn, Gaynor for the Friday Blog Project at Little Claire.  The project being inspired by the latest Blog Challenge 51 with Little Claire - creating a shaped card.  So I had a rummage through my stash and came across some pyramid card templates purchased ages and ages ago........yes typical of me.


Anyhow here's my make, sequence of piccies as usual...yes a picture does "paint a thousand words":


I added diamond glaze to the baubles, the trio of cats, adhesive red and clear crystals and a little glitter glue...and here is the card that inspired today's make:


Hope you likey........................xxGaynor and all at Little Claire.

Thursday 13 November 2014

November Club Stamp - Elephants Card Tutorial

Good morning,
 
Here is a little tutorial of my card using the fabulous November Club Stamp - 'Elephants'.  The set is bursting full of cute little elephant images, just right for special birthdays, baby and friend cards.
 
 
Here is my card using the set
 
 
Here is a product list of what I used
 
Little Claire 'Elephants' stamp set
White Card Blank
White Stamping Card
Purple Card
Lilac Check Paper
Lilac Dotty Ribbon
Memento 'Black Tuxedo' Inkpad
Promarker Pens
Bling stones
Circle Die
 
Card Instructions :
 
(1) Cut a piece of purple card to fit onto white card blank.
(2) Cut an oblong of lilac check paper and stick onto card.
(3) Attach ribbon to bottom of card at reverse, tie a firm bow.
(4) Die cut a circle from white card, stamp image onto it and colour in.
(5) Attach to side of card, over ribbon, cut edge off.
(6) Stamp up sentiment, matt onto purple card.
(7)  Stick sentiment over image firmly.
(8) Add bling stones around the card as shown.
 
If you love this little set as much as I do, you can pop on over to the website HERE and treat yourself.  You can also see details of how to join our monthly club.  It would make a really lovely Christmas present for that special friend or relative.
 
Heidi and
The Little Claire Team
 
xxxx


Wednesday 12 November 2014

Seems like we are racing through November...

...and we haven't yet showcased our new set of club stamps!

This month we have a lovely set of Elephants:


and here is the card which our club members will make with the project sheet within their packs:

designed by Heidi Green


Gorgeous purples and lilacs compliment the grey of the elephants perfectly, look at the cute baby in the mother's trunk too!

Our teamies have been busy too and here is a selection of their makes:

designed by Diane
Love how Diane has put a frame around the image and her choice of colours is just perfect, here is a different image from the set from Francy teamed with ribbon, lace and flowers - lovely:

designed by Francy
Gaynor has made good use of the words which are included within the set by stamping them on to tags:

designed by Gaynor
Here is a scalloped circle card from Marianne, using another of the images included within the set:

designed by Marianne
Here is the same image given a different look, by Shary (amazing what you can do with one stamp!):

designed by Shary
and finally a beautiful illustration of paper piecing from Helen N - a gorgous spotty blue elephant, how cute is he?

designed by Helen N
This is our club set of stamps for November, if you are not a member you can find out all about how to join here.

The Little Claire Team x